How to Connect an Ethernet Cable to a PC and Improve Network Speed
Slow internet can hinder your productivity, but a wired connection provides a straightforward solution. Many businesses rely on IT support services to set up reliable network connections for their teams. This guide walks you through the step-by-step process of connecting an Ethernet cable to your PC. You’ll learn how to verify the correct port, set up your connection, and test your speeds. By the end, you’ll have a faster, more stable internet connection.
Check for Ethernet Port on PC
Your PC needs an Ethernet port for a wired connection. This port gives you faster and more reliable internet than Wi-Fi. Look on the back of your desktop tower or the side of your laptop for the ports. The Ethernet port is rectangular with a small square opening for the connector. It’s usually labeled “Ethernet” or has an icon showing three connected lines. If your PC doesn’t have this port, you can purchase a USB-to-Ethernet adapter to establish a wired connection.
Obtain an Ethernet Cable
Visit a local electronics store or shop online for an Ethernet cable. Choose between Cat 5e, Cat 6, or Cat 7 cables depending on the speed you need. Ensure the cable is long enough to comfortably reach from your PC to the router. Look for cables with gold-plated connectors; they conduct signals better and last longer. Snagless boots on the cable ends protect the locking tab during setup and installation. A quality Ethernet cable makes a real difference in your network speed and reliability.
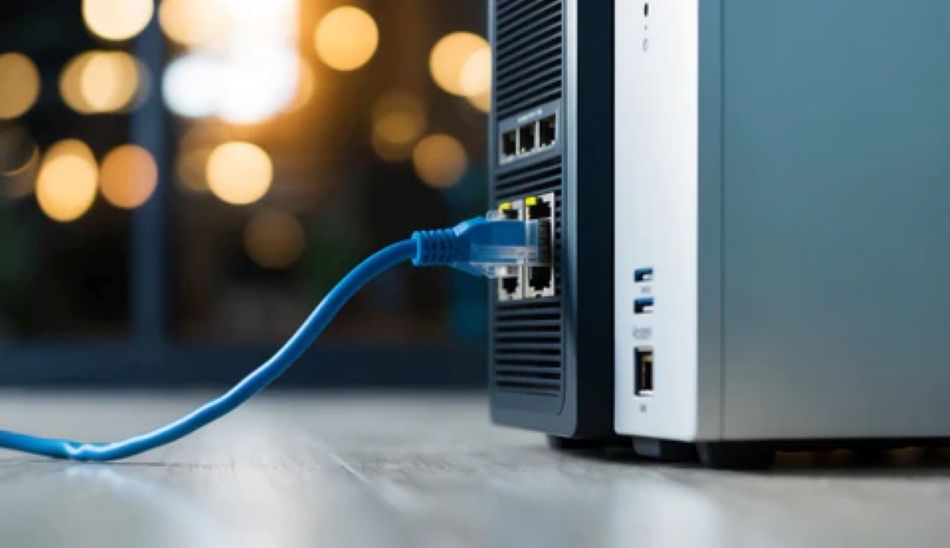
Connect the Ethernet Cable to the PC
Find the Ethernet port on your computer. It looks rectangular and slightly wider than a phone jack. Line up the clip on the Ethernet cable with the port and ensure it faces the correct direction. Push the cable gently into the port until you hear a click. Don’t force it, or you might damage the port. Check the indicator lights near the port; they should light up to confirm a successful connection. A secure Ethernet connection gives you the best network speed and reliability.
Configure Network Settings on PC
Once your cable is plugged in, adjust your network settings for the best performance. Here are four key steps:
- Adjust Network Adapter Settings: Open the Device Manager, locate your network adapter, right-click it, and select Properties. Change settings such as Speed & Duplex and Wake on LAN as needed.
- Set Preferred DNS Server: In the network adapter properties, add a preferred DNS server address. This speeds up your connection and makes it more reliable.
- Disable Unnecessary Protocols: Turn off any network protocols you’re not using in the adapter settings. This streamlines your connection and prevents conflicts.
- Enable Jumbo Frames: If your network hardware supports it, turn on Jumbo Frames to increase data transfer and reduce CPU usage.
Test Network Speed After Connection
Run speed tests to check the performance of your connection. Use trusted online tools, such as Ookla’s Speedtest or Fast.com by Netflix. Close any apps that use a lot of bandwidth before testing, as this gives you accurate results. After connecting your Ethernet cable, run the speed test several times throughout the day to ensure that speeds remain consistent. Compare your download and upload speeds to what your internet provider promised. This indicates whether the Ethernet connection has actually improved your network speed.
Troubleshoot Common Connection Issues
If your connection isn’t working right, check these four areas:
- Physical Inspection: Ensure the Ethernet cable is securely plugged in at both ends of your PC and your router or modem. Inspect the cable for any visible damage that could impact your connection.
- Network Adapter Settings: Ensure that your network adapter is enabled in Device Manager. Check for any driver updates or conflicts that may be causing connection problems.
- IP Configuration: Verify that your IP address settings are accurate and up to date. Use the command prompt to release and renew IP addresses if something appears to be incorrect.
- Firewall and Security Software: Temporarily disable your firewall and security software to determine if they’re blocking your network. Adjust the settings if needed to allow proper network access.
Related Topics: